How to Build a DIY Teleprompter for Under $30
You don't need to spend hundreds on a professional teleprompter. With a cardboard box, some glass, and your phone, you can build one that works just as well for a fraction of the cost.
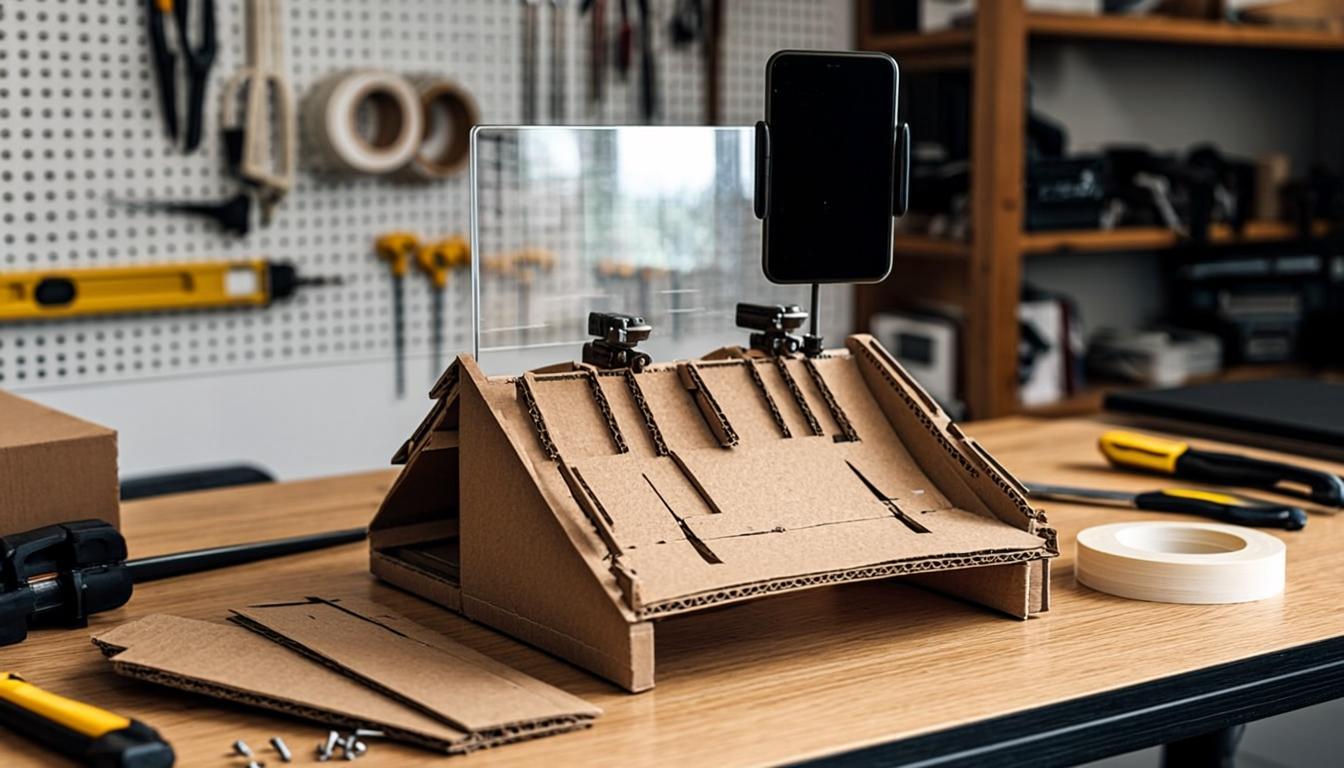
Professional teleprompters cost anywhere from fifty to several hundred dollars, and while they're worth the investment for serious creators, not everyone wants to spend that kind of money upfront. The good news is that the fundamental design of a teleprompter hasn't changed in decades. It's a simple concept: a piece of glass angled at forty-five degrees in front of your camera lens, with a screen displaying mirrored text below the glass. The text reflects off the glass and appears to float in front of the lens, and because the glass is transparent, the camera sees right through it. You can build this exact setup yourself for under thirty dollars, and the whole project takes about an hour from start to finish.
What You Need: The Materials List
Before we start building, let's gather everything you'll need. The total cost should come in well under thirty dollars, and you might already have some of these items lying around.
First, you need a smartphone or tablet with a teleprompter app installed. Any modern phone will work. I recommend PrompterPro or Teleprompter Premium, both of which have free versions with mirror text mode. Your phone is the screen that displays your scrolling script, so it's the heart of the entire setup.
Second, you need a piece of clear glass or acrylic. The cheapest option is an 8x10 inch picture frame from a dollar store, which typically costs one to three dollars. Remove the glass from the frame and you've got a perfect beam splitter. If you want something slightly better, you can buy a clear acrylic sheet from a hardware store for about five to eight dollars. Acrylic is lighter and less likely to break than glass, which makes it easier to work with.
Third, you need a cardboard box. The box should be roughly the size of a shoebox or slightly larger. An Amazon shipping box works great. You'll be cutting and folding this box to create the frame that holds the glass at the correct angle in front of your camera.
Fourth, you need some basic tools and supplies: a utility knife or scissors, tape (duct tape or packing tape works best), a ruler, and a marker. Optional but helpful: black spray paint or black paper to reduce reflections inside the box.
Fifth, you need a way to mount your phone below the glass. A small phone stand, a bent piece of cardboard, or even some folded tape will work. The phone needs to sit horizontally below the glass at roughly the same width as the glass itself.
Step-by-Step Assembly
Step one is to prepare your cardboard box. Lay the box on its side so the longest dimension is horizontal. This horizontal orientation will become the top of your teleprompter frame, where the glass sits. Using your ruler and marker, draw a diagonal line from the top-left corner to the bottom-right corner of the front panel. Cut along this line with your utility knife. This creates an angled slot where the glass will sit at approximately forty-five degrees.
Step two is to cut a hole for your camera lens. On the back panel of the box, cut a circular opening large enough for your camera lens to see through. Position this hole in the center of the back panel, at the same height as where the glass will sit. If you're using a smartphone as your camera, the hole only needs to be about two inches in diameter. For a larger camera, adjust accordingly.
Step three is to mount the glass. Slide your picture frame glass or acrylic sheet into the angled slot you cut in step one. It should sit at a forty-five degree angle relative to the front of the box. Use tape to secure it in place along the edges. Be careful not to crack the glass if you're using picture frame glass, which can be fragile.
Step four is to create the phone shelf at the bottom of the box. Cut a rectangular piece of cardboard that fits inside the bottom of the box, positioned so it will hold your phone horizontally, face up, directly below the angled glass. Tape or glue this shelf in place. The screen of your phone should be angled upward toward the glass so the text reflects properly.
Step five is optional but recommended: paint or cover the inside of the box with black paper. This reduces reflections and glare inside the teleprompter, which improves the clarity of the reflected text. Any reflections on the glass will make the text harder to read, so a dark interior is worth the extra effort.
Setting Up Mirror Text Mode
This is the step that trips up a lot of people. In a beam splitter teleprompter, the text on your phone screen reflects off the glass to appear readable to you. Because of how reflections work, the text needs to be displayed in mirror image, or horizontally flipped, so that it reads correctly after reflecting off the glass.
Open your teleprompter app and look for a "mirror mode" or "flip text" setting. This is usually found in the display or settings menu. When you enable it, the text will appear backwards on your phone screen but will read correctly when reflected off the glass in your teleprompter.
Test this by placing your phone face-up on the shelf inside your teleprompter, turning on the scroll, and looking through the glass from the camera's position. The text should appear right-side up and readable. If it's still backwards, toggle the mirror mode off and try again.
Mounting Your Camera
Position your camera or smartphone behind the teleprompter so the lens looks through the hole you cut in the back panel. The lens should be centered and as close to the glass as possible without touching it. You can use a small tripod or make a camera stand from more cardboard.
The key alignment here is making sure the camera sees through the glass clearly while the reflected text appears to float just above the lens from your perspective. Adjust the distance between your phone screen and the glass to change the apparent size and position of the reflected text.
Tips for Improving Your DIY Build
After building your first DIY teleprompter, you might notice a few areas where it can be improved. Here are some upgrades that cost very little but make a big difference in usability.
First, add some padding or foam around the edges of the glass to hold it more securely in place. This prevents the glass from rattling or shifting during recording, which would cause the text to move.
Second, if the reflected text isn't bright enough, increase your phone's screen brightness to maximum and reduce the ambient light in your recording space. The brighter the phone screen relative to the room, the clearer the reflected text will be.
Third, consider upgrading from picture frame glass to a dedicated beamsplitter mirror. These are available online for ten to fifteen dollars and are specifically designed for teleprompter use. They have a coating that reflects more light than regular glass while remaining more transparent, giving you brighter text that the camera can still see through.
Fourth, if the cardboard box feels flimsy, reinforce it with additional layers of cardboard or upgrade to a foam core board. Foam core is cheap, easy to cut, and much more rigid than cardboard.
Fifth, add a small LED light strip inside the box to illuminate the phone screen from below. This can boost the reflected text brightness significantly, especially if your phone screen isn't the brightest.
Using Your DIY Teleprompter
Once your build is complete, load a script into your teleprompter app, position yourself in front of the camera, and start recording. It will feel a little different from a professional teleprompter, but the functionality is exactly the same. You'll see your scrolling text reflected in the glass, and your camera will see through the glass to capture your face.
Practice with short scripts first to get comfortable with the reading angle and text size. Adjust your phone's position to fine-tune where the text appears relative to the camera lens. Within a few recording sessions, you'll be producing polished videos with a teleprompter that cost you less than thirty dollars to build.
The satisfaction of creating something functional with your own hands is a bonus. Every time you hit record and see that text floating in front of your lens, you'll know you built the tool that makes it possible.